Showing posts with label transplanting. Show all posts

Monday, March 18, 2024

How to plant your new bare root perennials, vines and ground covers.

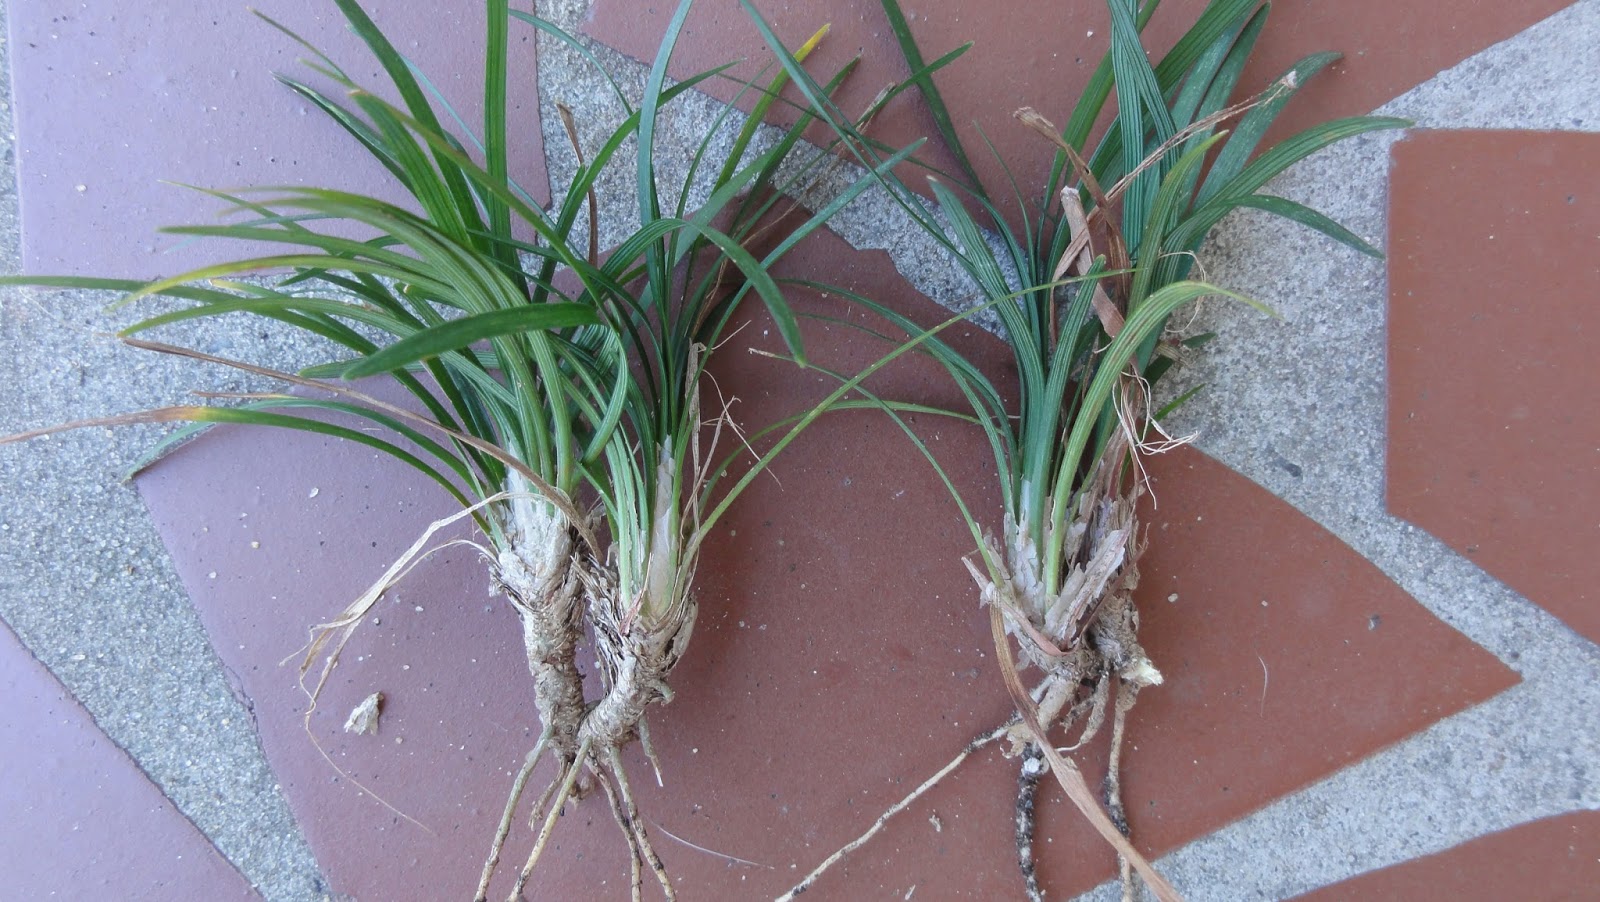
 Bare root liriope

Bare root planting is an excellent way to establish a lot of plants at a very reasonable cost, usually priced at much less than container grown plants. Certain steps, however, are necessary to ensure success.

When your plants are delivered, they should find them bundled and wrapped in a moist medium, such as sphagnum moss or paper. Since there is no soil around the roots to provide protection, they must not be allowed to dry out. When the plants arrive, open the box as soon as possible. Set the bundles upright in the box. Protect the package from exposure to wind, sun, freezing temperatures. Keep slightly moist. Plant immediately. If that’s not possible, keep the package stored for a very few days as directed.

The day before planting, inspect the roots. If they’ve dried, plunge them in water for a few hours to re-hydrated. When planting, continue protecting the plants from the elements. A few minutes root exposure can be damaging.

Have the soil prepared and the holes "punched" in the ground before you begin. We recommend using a dibble or garden trowel with depth markings etched for guidance. Cover the roots after planting each one. Water well after planting to set the soil in contact with the roots.

Do not allow synthetic fertilizer granules to contact the plants above or below the soil line.

A thin layer of mulch may be added to aid in moisture retention and weed control.

Return to GoGardenNow.

Saturday, March 2, 2019

FAQ: Are there any special requirements for bare root?

Asiatic Jasmine - Trachelospermum asiaticum - Bare Root

Q. Are there any special requirements for bare root? Want to purchase but need to know what I’m getting into.

A. Good question. Since there is no soil around the roots to provide protection, they must not be allowed to dry out. When the plants arrive, set the bundles upright in the box. Protect the package from exposure to wind, sun, freezing temperatures. Keep slightly moist.


When planting, do the same. A few minutes exposure can be damaging.

Have the soil prepared and the holes "punched" in the ground before you begin. Cover the roots after planting each one. Water well after planting to set the soil in contact with the roots.

Do not allow synthetic fertilizer - especially dry granules - to contact the plants above or below the soil line.

That about covers it.

I hope this helps. If you have more questions, don't hesitate to ask. If you have anything to add, we'd love to hear from you. Let us know in the comment section.


Return to GoGardenNow.com.


Thursday, January 10, 2019

FAQ: Collecting Native Plants From The Wild

Galax urceolata and Chimaphila maculata (center)

Q. Hi. I want to collect native plants from the wild to transplant to my garden. Do you have any tips on how to go about it?

WARNING! WARNING! WARNING! WARNING! WARNING!

.A. First, let me say that collecting native plants from the wild might not be a good idea. If everyone did it, the populations of some native plants would be diminished. But, actually, very few do it, so you might not have much of an impact.

Secondly, many native plants are protected by federal, state and local governments. You could get into a whole heap of trouble if you started digging whatever strikes your fancy.

Thirdly, many federal, state and local lands are protected and closely guarded by their respective governments; national and state parks, for example. Collecting rocks, minerals, plants, animals, fossils, antiquities, and your neighbor's camping equipment is strictly forbidden.

Fourthly, you mustn't collect plants from private properties without the owners' permissions.

Fifthly, collected plants might not survive the collection and transplanting process. They'd be much happier if left alone.

Sixthly, collected plants might host pests and diseases that you'd rather not have in your garden. Quarantining can be a long and disappointing process.

But, if you are able to navigate the difficulties, get permission, etc., here are some quick tips:

  1. Study the plants that you intend to collect, i.e. know before you go;
  2. Collect during the dormant season;
  3. Get as much of the root system as possible;
  4. Keep the roots moist from start to finish;
  5. Avoid exposing plants to the air, bright light, freezing temperature and the elements before transplanting;
  6. From collection to transplanting, keep the time short;
  7. Plant your acquisition in a site that is as nearly like its native habitat as possible, considering soil structure, light exposure, plant community and moisture level;
  8. Plant at the same depth that your acquisitions were growing before;
  9. Soak the soil immediately after planting so it is in close contact with the roots;
  10. Do not let fertilizer contact any plant tissue;
  11. Provide appropriate care and maintenance.

I hope this helps.

There's always more that could be said, so if any of you gentle readers would like to comment, please do so in the comment section  provided. We'd love to hear from you.

If you have questions about native plants, please comment below.

Return to GoGardenNow.com.


Sunday, July 15, 2018

Any chance Boston ivy plants will recover from heat stress?


Q. Hi, I bought some of your [Boston] ivy a couple weeks ago, the weather was hot here at the time and the postal carrier left the box of ivy on our blacktop driveway in the sun when the temps were near 100. Any chance these plants will recover?

A. I'm sorry to hear that the plants were subjected to such stress. If the roots remained viable, there should be good hope for recovery.

Any damaged foliage and stems - blackened, dried and brown - should be removed. They won't recover.

I assume you planted the vines soon after receipt, watered them in properly, etc. At this point, take care not to water too much. Fewer or no leaves means less  or no water take-up, so too much moisture in the soil could contribute to root or stem rot. Let soil dry slightly between watering events. Watch for bud enlargement at the leaf axils. I hope this helps. Keep me posted.

--------------------------------------------------------------------------

Have any of you readers had an experience such as this? Were you successful in reviving your plants? If so, let us know in the comment section what you did to bring them around.


Tuesday, March 20, 2018

Should I trim the green daylily leaves after planting?

Bare root daylily - Hemerocallis - plants

Q. We received our 100 yellow daylily bulbs last week and they are now planted. I have a question-should I go ahead and trim the green tops or wait a while? I want to do everything I can to encourage blooms. Thanks so much. We were thrilled that they came in such a great shape!

A. Thank you for your nice note. There's no need to trim the leaves unless there are some damaged portions to remove. Otherwise, leave them. They will help to feed the plants via photosynthesis. If leaves turn yellow or brown due to transplant shock, they can be removed. 

Rate goGardenNow at the Garden Watchdog

Wednesday, August 2, 2017

FAQ: How can I tell if my holly is dead?


Q. I transplanted a large Fleming holly in the spring. Soon afterward the leaves turned brown and fell off. I've been watering and fertilizing it, but I believe it's dead. I hate to dig it up unless I'm positively sure. How can I tell if it's truly dead?

A. With a pocket knife or your fingernail, scratch several places on the stems, starting at the top and working downward. If you see green beneath, it's still alive at that point. If it's brown, cut it off.

Even if the cambium is green, the plant might eventually die. But if you care enough to keep it, continue watering when needed. Don't add fertilizer. Keep an eye out for tiny vegetative buds forming and leaves emerging. It's still possible your holly will survive.

Return to GoGardenNow.com.

Tuesday, April 5, 2016

How should I take care of bare root plants until I plant them?


Hedera helix - bare root

 Q. If I buy bare root plants from you, how should I take care of them until I plant them? How soon must they be planted?

A. You will receive your bare root plants from us in bundles wrapped with moist packing medium. When you receive your package, open it. Set the bundles upright in the box. Retain moist packing material around the roots. Avoid exposing the plants to sun, wind and freezing temperatures. Do not let the roots dry.

If you can’t get around to planting very soon, place the bundles upright in moist potting soil. Cover the roots with soil. Water well. Keep the roots moist until planting time. Plant sooner than later. Never let the roots dry.

Return to GoGardenNow.com.

Wednesday, September 16, 2015

How to move shrubs to a better place in your landscape.

Q. I want to move some shrubs to a better place in my landscape. Can you give me some helpful hints?

A. You didn’t say how large the shrubs are, or the kind. I’ll assume they’re small enough for a couple of people to manage with hand tools. I’ll give some general instructions regarding kind.

If you’re in no hurry to move them, I suggest you root-prune them to develop a more concentrated mass of roots near the base of the shrubs. To do that, you only need to take a nursery spade and slice downward into the soil in a circle around each shrub. By slicing through roots, you will encourage roots to branch within the circle. A three-foot diameter should be sufficient. After slicing, leave the plants in place for a few months. Be sure to fertilize and irrigate your shrubs within the circles.

It’s best to move them from late fall to early spring when they are dormant, or at least when not in an active growth stage.

For specific instructions on digging and transplanting, it is best to refer you to instructional videos. Since I haven’t created any on the topic myself, take a look at this one on How To Ball and Burlap Dig A Tree. Following that, view How To Plant A Ball and Burlap Dug Tree.

I hope this helps.

Return to GoGardenNow.com.

Tuesday, October 1, 2013

How DEEP do you plant bare root Ophiopogon japonicus 'Nana' - Dwarf Mondo Grass - divisions?


Q. How DEEP do you plant bare root Ophiopogon japonicus 'Nana' - Dwarf Mondo Grass - Bare Root?

Dwarf Mondo divisions (Ophiopogon japonicus 'Nana')

A. It's not planted deeply. You'll see some whitish, papery tissue at the base of the leaves just above the roots. Ideally, it should remain exposed. If some is covered with soil, it'll be okay. The green portion of the leaves should not be planted below grade.

Return to Ophiopogon at goGardenNow.com.

Monday, September 23, 2013

Amaryllis leaves are dying after I transplanted them.

Dead leaves on transplanted hippeastrum.

Q. Hey. I asked you back in June if I could move my amaryllis in summer even though the foliage never died back. You said I could. Now the foliage is dying back. Will the bulbs die, too? I'm sending you a picture.

A. Judging from your photo, the bulbs are in good health. Notice the firm shoulder. It's not unusual for the foliage to die back. In fact, it's normal. I expect that your plants will bloom nicely next season. The ones that have defoliated may even bloom earlier.

Return to GoGardenNow.com.

Saturday, June 29, 2013

Can I move my amaryllis in summer?


Q. I have amaryllis bulbs planted in my garden. They never become fully dormant even in winter, but they bloom okay every spring. I need to move some of them. Can I move them even though the leaves are still green?

A. Yes, you can move your amaryllis (Hippeastrum) even in summer. I suggest you dig up as much of the soil around them as possible to avoid disturbing the roots. Dig another hole the same size at the site where you intend to transplant them, then carefully drop the root ball in the empty hole. Water well when complete. You shouldn't have any problems.

Return to GoGardenNow.com.

Monday, October 1, 2012

How To Dig A Root Ball For Transplanting.

Q. I wanted to transplant already established juniper.  It has overgrown the sidewalk and needs to be removed.  I wanted to transplant that to a completely different area.  Do you have any hints on digging out the roots from a plant that is already established?

A. Mature shrubs can be difficult to transplant. The biggest problem is weight. A large root ball can weigh several hundred pounds. Another problem is trying to retain soil around the roots. Wrapping the root ball with burlap is the most popular method of keeping the roots and soil intact. If your shrub is very large, you should contact a local nursery for assistance.

If you plan to move it yourself, you'll need:
  • A sharp garden spade,
  • A large square of burlap cloth (never plastic!),
  • A small box of 12 gauge 2-1/4 inch nails.
It's best to dig shrubs and trees during winter dormancy. Junipers, being evergreen, don't go fully dormant, but it's still better to dig from late fall to early spring.

To transplant your shrub, you'll need to dig the roots with soil intact in the form of a ball. Then you'll need to wrap the ball in burlap. Secure the burlap tightly around the ball by pinning the fabric with nails. It's kind of like wrapping the soil ball in a big diaper.

Begin by determining the necessary size of the root ball. Keep in mind that most feeder roots will be near the outer circumference of the leafy portion of the shrub. If the shrub is very large, the root ball will be very large. In order to keep the root ball to a manageable size, some of the feeder roots must be sacrificed. As a rule of thumb, the radius of the root ball should be 11 inches for every 1 inch of the diameter of the trunk. Measure the trunk about 6 inches above the soil line.

Begin by removing any weeds, grass, fallen leaves, mulch, etc. from around the shrub.  Mark a circle in the soil to designate the size of the root ball, as determined above. Scrape the soil clean inside the circle.

If the soil is loose, stomp on it all the way around the shrub to compact it. During the entire process of stomping and digging, take care not to damage the bark of the trunk.

Following the circle, dig a shallow trench around the shrub with the corner of a spade. Then from the trunk of the shrub, begin forming the ball inside the circular trench. The ball will slope outward and downward from the trunk. It's like gently carving a ball out of soil. You will probably contact roots as you work. You'll have to cut through them, but be careful not to crack the ball. Shape it little by little. Don't be impatient.

When you've shaped the top half of the ball, begin gently digging under the ball as you shape the underside. When you've shaped about three-fourths of the ball, begin forcing the spade under it at an angle. You'll cut some roots. Always be careful not to destroy the ball. Again, be patient. Work slowly and carefully.

Once the ball is separated from the rest of the soil, gently tip the plant to one side and work the burlap under the ball. If the soil is holding together well enough, you may be able to lift it and have someone slide the burlap under the ball. Or you may have to use the spade to lift the ball onto the burlap.

Return to GoGardenNow.com.