Composting happens all the time without human intervention. Leaves fall, grasses die, wood rots and the circle of life from a seedling to a plant’s final end returns the basic building blocks of life to the soil for another go-round.
Gardeners can use this process to their benefit by gathering and confining the organic material to an easily accessible location for the process to occur. It can be in an open pile or contained in a box, barrel, bucket or bin. The choice is yours. The end result is COMPOST – black gold for the garden.
For the organic material to be useful, it must be decomposed. For it to be useful sooner, it must decompose faster. The key to faster decomposition is turning – turning the material over and over so that all the ingredients are exposed to the insects, worms and micro-organisms for digestion and decay.
We’ve tried every basic method – open piles, boxes and bins. Some were flimsy. Others were not very durable. Some were simply inconvenient to manage. I’ve seen the manufactured barrels that rotate on metal or wooden stands, or those on rollers for kicking over and over. I was sold on the concept, but not the products on the market, so I decided to try composting in a barrel of my own making.
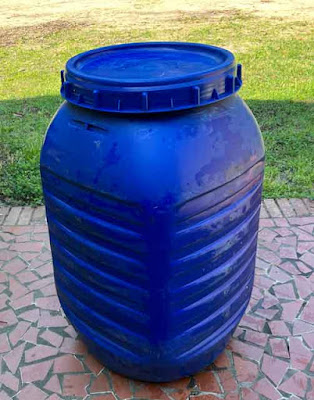
I paid a visit to The Barrel Man. He’s just down the road from me. He sells all kinds of used barrels at very reasonable prices. I selected this 60-gallon plastic, flat-sided barrel with a screw-on lid. It also has an inner lid for better sealing.
“What was it used for?”, I asked.
“Meat processing by-products”, he said.
I opened it up to sniff. It smelled clean enough; not offal.
“Oh, it’s been cleaned”, he informed. “It’s food-grade plastic.”
So, I paid him, loaded it into my pickup truck and headed home.
Why did I choose a flat-sided barrel? I’m glad you asked. I don’t intend to mount it on a stand, but to push it over on its side and kick it around several times to mix the ingredients, and maybe turn it upside-down, too. I figure the flat sides will do a better job of shifting and mixing the material inside for faster decomposition. It can’t get any simpler than that.
The only tools needed were a power drill, a 1” hole saw, a 2” hole saw, and a big, black, felt-tip marker.
I began by marking the ribs on all four sides where I’d drill the aeration holes. These holes were drilled with the 1” inch hole saw.
Then I turned the barrel upside-down. I used the 2” hole saw to penetrate the very center, and the 1” hole saw to make four more drainage holes around the circumference. When the barrel is filled, I hope these drainage holes will also provide entry ways for earthworms and other busy critters when the barrel is in direct contact with the ground.
Important tips: 1) the bottom is thicker than the sides, so takes longer to penetrate; 2) take your time cutting with a firm hand, 3) better do your work over a tarp so you can gather the plastic shavings and dispose of them properly.
It wasn’t long before I had the barrel mostly filled with leaves, vegetable and fruit scraps, coffee grounds and torn paper filters, shredded documents in layer upon layer. I could see that it wouldn’t be long before my barrel would be maxed-out. So I headed back to The Barrel Man for more barrels. These flat-sided composters can be easily lined up near the garden, all in different stages of decomposition, taking less space than round barrels.
That’s all there was to it. You can do it, too.
To see a YouTube video of this process, click here.
Return to GoGardenNow.com.


No comments:
Post a Comment