Tuesday, April 23, 2024

How to replace turf with asiatic jasmine.

Trachelospermum asiaticum

Q: We want to cover zoysia turf with asiatic jasmine....[but] wonder if we must remove the turf, or can we plant the jasmine over very closely cropped zoysia? Also, how do we plant "bare root" jasmine? Thanks for answering all the rookie questions.

A: Yours are good questions. Thanks for asking.

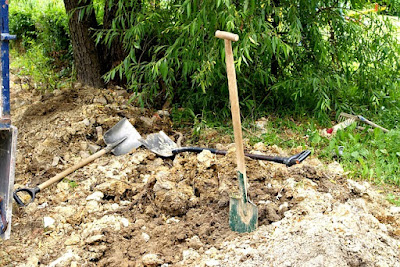
I understand that you want to replace the turf with asiatic jasmine, but don't know whether to remove the zoysia or plant into it. Though I often recommend tilling, removing the turf and/or tilling the soil will expose weed seeds that have been long-dormant, resulting in a weed problem. On the other hand, the living turf will present competition for moisture and nutrients the jasmine will need. Why not crop the turf, spray it with herbicide and leave the dead grass in place? The zoysia should expire in about 10 to 14 days. This will leave a mulch cover over undisturbed soil. Unless the soil in the planting site is compacted,  the jasmine should grow well. If the soil is a little compacted, you could loosen it around each planting hole with a trowel before installing the jasmine. Incorporate a bit of fertilizer or compost in each hole before planting, taking care that synthetic fertilizer doesn't contact the new plants.

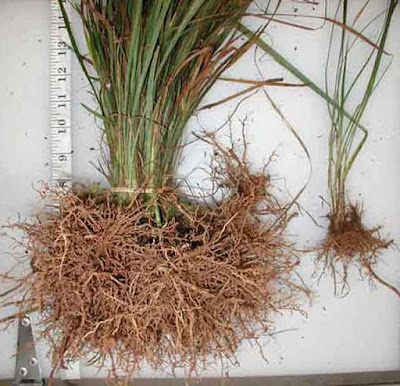
Planting bare root is easy enough, though takes a little care. Be sure that the roots are kept moist before planting. Do not allow them to dry out. Follow the instructions about loosening the soil and adding fertilizer or compost as noted above. Make sure that the roots are spread out a bit and covered with sufficient soil. Water well. Maintain soil moisture until the plants are established, allowing the soil to drain before irrigating again. Don't drown them with love. Depending on your site, considering sun, wind, etc.,  you might be watering every couple of days. Monitor the condition of the plants and soil throughout the season. Once asiatic jasmine is established, though, it is tolerant of dry conditions.

You could add some mulch on the dead zoysia between the jasmine, if you like, for extra moisture retention and weed suppression. Since you live in the South, pine straw might be readily available to you. Don't blanket the jasmine plants themselves.

I hope this helps. If you have any questions, don't hesitate to contact me.

Return to GoGardenNow.

Saturday, April 20, 2024

Free yourself with a dry weather garden.


Image by d Bossarte from Pixabay

Sure, you love gardening and all its benefits. But don't you wish sometimes that you could get away from it, even for just a little while without asking a friend to stop by and water your plants while you're gone?

Consider intentionally establishing a dry weather garden. Whether you're growing flowers, vegetables, or some of both, it's quite possible. It's called "xeriscaping."

A xeriscape can provide a low-maintenance, water-efficient way to garden while freeing up time for that vacation or even a weekend away. Here are some ways a dry weather garden can help you briefly escape:

1. Less watering: With drought-resistant plants and water-efficient practices, a xeriscape can reduce the need for frequent watering. This means less time spent tending to your plants and more time for other activities.

2. Low maintenance: Dry weather plants tend to require less maintenance than traditional gardens because they are better adapted to growing in harsh conditions.

3. Cost effective: Using drought-resistant plants and sustainable gardening practices can mean less money spent on irrigation, fertilizer, and pesticides.

4. Eco-friendly: Xeriscaping is an eco-friendly way to garden. It can reduce water waste, conserve resources, and promote a healthy ecosystem.

5. More flexible: Dry weather garden planning allows for more  creativity and experimentation with different plants, new styles and layouts.

In summary, a xeriscape can be a great way to free yourself from the time and cost constraints of traditional gardening. By using drought-resistant plants and sustainable practices, you can create a beautiful and low-maintenance garden that is eco-friendly, cost-effective, and a real time-saver.

Return to GoGardenNow.

Wednesday, March 27, 2024

Why not start a native plant garden?

Native Gelsemium
Native Gelsemium

Nature flourishes all around us. It’s no wonder. The native plants and wildlife are well-adapted to thrive in our localities. Native plants proliferate because the soil, climate and moisture meet their exact needs, and they have natural defenses against pests and diseases. Native wildlife and plants “grew up together”, so to speak. They have natural affinities. Native plants provide those things which wild things need for continuing existence: food, shelter, and places to reproduce. They’ve been prospering together for millenia.

Yet, we often struggle to grow non-native plants in our gardens. Why work so hard? Start a native plant garden. Because they are naturally adapted, they don’t need the care that many non-native plants require.  Furthermore, landscaping with native plants benefits the local environment and its wildlife, too.

Native plants are those which exist naturally in the environment and were not introduced by humans.  How do you tell, though, which are native plants, and which are not? Sometimes it’s hard to determine, especially when invasive non-native species have taken over.

Begin by observing your surroundings. Check out the soil, moisture levels, sun exposure, trees, shrubs, vines, forbs, and grass-like things. Even the “weeds.” Write stuff down, especially noting flowers, attractive seeds, leaves, branches and bark, and where plants are growing.

If you can’t identify your native plants, get a book on the subject from your local library, or buy one. I have several texts on native plants of the southeastern United States. No doubt there are similar books for your region. There are probably smartphone apps to aid in plant identification. The National Wildlife Federation has a neat tool, Native Plant Finder, that allows you to enter your zip code to discover appropriate plants.

As with any garden, determine the correct location, or use whatever limited area is available to you. Take the soil type, sun exposure, and moisture level into account, then choose your plants accordingly.

Prepare the soil as you would for any garden or landscape. Begin with a soil test. Add amendments and cultivate it, if recommended. You might remove existing grasses and weeds, unless some of the weeds are native and desirable.

Principles of garden design are pretty much the same for a native plant garden as for any other. Install plants with similar requirements together. Stagger bloom times and other seasons of interest so you always have something lovely going on in your space.

To incorporate your native plant garden into the landscape, consider using locally sourced elements that say something about your region to give a sense of place. These might include shells and stone, boulders, sculptures, farm implements, or historical features.

Over time, you should find that your native plant garden requires less care than conventional plantings because the inhabitants actually belong there!

Return to GoGardenNow.

Monday, March 18, 2024

How to plant your new bare root perennials, vines and ground covers.

 Bare root liriope

Bare root planting is an excellent way to establish a lot of plants at a very reasonable cost, usually priced at much less than container grown plants. Certain steps, however, are necessary to ensure success.

When your plants are delivered, they should find them bundled and wrapped in a moist medium, such as sphagnum moss or paper. Since there is no soil around the roots to provide protection, they must not be allowed to dry out. When the plants arrive, open the box as soon as possible. Set the bundles upright in the box. Protect the package from exposure to wind, sun, freezing temperatures. Keep slightly moist. Plant immediately. If that’s not possible, keep the package stored for a very few days as directed.

The day before planting, inspect the roots. If they’ve dried, plunge them in water for a few hours to re-hydrated. When planting, continue protecting the plants from the elements. A few minutes root exposure can be damaging.

Have the soil prepared and the holes "punched" in the ground before you begin. We recommend using a dibble or garden trowel with depth markings etched for guidance. Cover the roots after planting each one. Water well after planting to set the soil in contact with the roots.

Do not allow synthetic fertilizer granules to contact the plants above or below the soil line.

A thin layer of mulch may be added to aid in moisture retention and weed control.

Return to GoGardenNow.

FAQ: What is a dibble?

Dibble image by Davie Bicker from Pixabay
Basket, dibble and garden trowel

A dibble (aka dibber) is little more than a pointed stick used to aid in planting rooted cuttings, small transplants, seeds and bulbs. 

They are usually made of wood, metal, plastic, or a combination of materials about 1.5” to 2” diameter and varied lengths. Most have simple handles such as knobs, pistol grips, t-handles or stirrup handles. Some have horizontal markings etched or carved into the lower end of the shaft for uniform depth control.

The invention of dibbles is obscure, though undoubtedly it happened in ancient times across regions and cultures when our ancestors thought of a better way to make little holes in the ground than poking them with their fingers. Then, when they got tired of laboring on their hands and knees, longer dibbles were designed for working from a standing or walking position. 

 Ancient dibbler

Two-person teams of dibblers are known to have been employed. One dibbled while the other dabbled. Perhaps representing an evolutionary regression, most modern garden dibbles are short and dibblers often work alone.

As with all tools, dibbles should be cleaned of soil after using to prevent rust, corrosion or rotting.

Return to GoGardenNow.

Thursday, March 7, 2024

Call Before You Dig!

 Shovel image by Poor_photographer from Pixabay

Call before you...WHAT?

‘Tis a season for planting. Homeowners are gearing up for improving their properties, making plans, buying trees and shrubs, and maybe even installing irrigation, fences or mailboxes. No doubt, this will involve digging holes or trenches.

Before you begin, you'd better find out what you're getting into. There could be electric power lines, outdoor lighting, conduits, gas lines, fuel oil pipes, buried telephone or internet cables, fiber optics, potable water or irrigation pipes/valves, sewage/drain pipes. You don’t want to cut through any of those. Accidents, some with very serious consequences, can occur if safety isn’t heeded, including explosions, flooding, electrocutions. Make a list of all utilities and contractors that you THINK might be involved.

Mark the specific area(s) where you’ll be working, so utilities aren’t flagging or painting your entire yard.

To find out utility locations, Dial 811 - Call Before You Dig, to make “a locate request.” It shouldn’t cost you anything, but it might. (Get that settled up-front.) The call center will contact all utilities in your area that subscribe to this service. You should receive a confirmation “ticket” or some such communication telling you which services have been contacted. Bear in mind, though, that not all utilities or contractors subscribe to this service! If you suspect that a utility wasn’t included on the list, double-check. Personally call the contractor, if necessary.

Here are a few of the most neglectful or uninformed contractors:

  • Cable TV companies;
  • Invisible dog fence installers;
  • Irrigation contractors;
  • Security firms.

In some cases they have no idea where their lines were buried. “It was so long ago…”

Utilities and contractors that have been notified must come to your property to mark their lines, usually with flags or paint, within a specified period of time particular to your state or area.

The markings are color-coded.

Red: Electric power lines, cables or conduit, and lighting cables.
Yellow: Gas, oil, steam, petroleum, or gaseous materials.
Orange: Communication, alarm or signal lines, cables or conduits, and fiber.
Blue: Potable water.
Purple: Slurry, irrigation and reclaimed water.
Green: Sewers, drainage facilities or other drain lines.

Once you’ve waited the few days required, check your list to confirm that the notified utilities have responded. If some didn’t, report it.

When you’ve done everything required for your safety, proceed with caution. Be sure not to dig where markings have been displayed. Dig promptly before the markings disappear due to wind, rain or landscape maintenance. Avoid surprises.


Return to GoGardenNow.


Saturday, March 2, 2024

How to use less soil and save money in your raised bed garden.

 Raised bed with filler

Though raised-bed gardening is an excellent way to grow flowers and vegetables, it can require a large initial investment. Whether you construct it yourself or buy it in kit form, the materials come at no small price, unless you’re scrounging around for scraps.

Add to that the cost of soil. A typical 4’ x 8’ x 1’ box will require 32 sq. ft. of soil. To confuse (obfuscate?) matters, commercially available soils may be sold in liters, square feet, square yards, cubic feet, cubic yards or quarts. One nationally advertised brand sells for around $11.00 for 1.5 cubic feet. If you knew what you’d be spending beforehand, you’d be gobsmacked.

Get out your calculator and search the internet for a formula to convert your square feet to whatever. UnitConverters.net is a good place to start. You’ll need to do this if you aim to budget ahead and find the best deal on soil.

Once you’ve figured out how much soil you’ll need, divide that by about one-half. That’s right! That’s how much soil you’ll actually need if you follow my advice.

A gardening technique that is gaining a lot of attention with thrifty gardeners is called Hügelkultur. It literally means “mound culture.” The authentic form involves building a mound with decaying wood, brush and leaves covered with soil. After a period of time, vegetables and ornamentals are planted. Advantages are many. Burning isn’t needed, nor are other means of disposal. More or less permanent garden features are established. Decaying organic material provides abundant nutrients. Rainfall runoff can be better controlled. Garden soil drainage will be enhanced. NOTE: As with many things, advantages can be limited.

The hügelkultur method can be modified for use in raised beds. Simply collect organic yard waste, and half-fill your raised bed structure. This will save you a whole lot of money!

Over time, the filler debris will decompose, and the soil level will sink somewhat. That’s to be expected. But the addition of mulch and humus season after season will tend to offset the shrinkage.

I believe you’ll find the hügelkultur method to be much to your liking. If you’d like to learn more about the history and proponents of Hügelkultur, check out works by Josef "Sepp" Holzer, Rudolf Steiner, James Paris, Luke Potter, and Herrman Andrä, among others.

Return to GoGardenNow.

Monday, February 19, 2024

Do you really need a raised bed garden? No, but…


Garden image by venture_out from Pixabay

Back in the day, most gardeners gardened in the good old-fashioned way by planting directly in the ground. It seemed like the right thing to do because we’d always done it that way, and others had, too. There’s certainly nothing wrong with that if it’s your choice.

But some of us have abandoned our past methods and adopted raised-bed gardening for our vegetable and ornamental plants. Why? Here’s why.

  Garden image from Pixabay

Weed control is less of a problem. Because we raised-bed gardeners usually buy soil and humus or produce our own compost, fewer weeds are imported than if native soil is used. This saves time, energy and frustration.

Watering is easier to control. Plants are usually grown closer together. There’s no wasted space. Consequently, irrigation is accurately directed where it’s needed. Less water is wasted irrigating spaces between rows normally found in traditional gardens. Whether or not you have a private well, this represents a significant savings.

Watering image by Ralph from Pixabay

Soil compaction is eliminated because you aren’t tromping through your raised beds.

Raised beds invite closer plant spacing, therefore producing higher yields in less space.

Soil in containers and raised-beds warms earlier in the season due to sun exposure on the sides, stays warm longer, and extends the growing seasons. When cold weather does arrive, it’s easier to protect plants with protective frost covering.

Because soil is confined in the containers, rainfall and irrigation waters don’t run off. Erosion is reduced.

You can adjust your garden soil to suit the needs of your crops in their assigned spaces. It’s easier to amend pH and nutrient levels as required, and native soil has less of an impact on your planting soil.

No more bone-jarring roto-tilling is required!

You can garden wherever you want. Would-be gardeners with limited space on a balcony or patio can still grow stuff and transform their environment into productive spaces.

Raised-bed gardeners don’t have to bend over so far to work. What’s more, gardening height can be adjusted to suit their needs. This is just the ticket for disabled persons and senior citizens

So, if you desire to plant a garden but feel that you don’t have the space or ability to do it, raised-bed gardening might be just right for you.

Return to GoGardenNow.com.

Friday, February 9, 2024

Behind the Garden Wall: Mead Botanical Garden, Winter Park, FL

Mead Botanical Garden Entrance

Sometimes hidden gardens present fine rewards. Such is the case with the Mead Botanical Garden in Winter Haven, Florida. Tucked behind a residential neighborhood, Mead Botanical Garden is a modest trove of tropical species.

Theodore Mead, age 22

The Garden opened in 1940 in honor of noted horticulturist Theodore L. Mead (1852 – 1936). Mead was a pioneer in breeding new varieties of tropicals such as caladiums, bromeliads, orchids, daylilies, amaryllis and crinums. He was also a butterfly aficionado, apprenticed to William Henry Edwards, author of The Butterflies of North America. Mead is appreciated for discovering more than 20 new species of North American butterflies.


Neoregelia carolinae

Theodore and his wife moved to Oviedo, Florida in 1881. Oviedo was formerly known as the Lake Jesup Community. There he built greenhouses, propagated epiphytes and other tropicals, planted a citrus grove and gardens.

South Florida Railroad Depot

He was a sort of pioneer in the area. This was the “Old Florida” that some of us love to read about. Central Florida was becoming more accessible, thanks to railroads such as Henry Plant’s South Florida Railroad from Sanford to Tampa, with a railroad link to Oviedo. The Steamboat, Volusia, plied the waters weekly from Sanford. Orlando was soon to be re-incorporated.

Florida steamboat

 Considerable interest in citrus production was being promoted. Orchards were being planted. 

Of course, transportation was needed. A historical marker, located at the boat ramp at the end of Black Hammock Fish Camp Rd, east of FL 417 and north of Oviedo, tells of some efforts.  

“The Lake Jesup Steamboat company was incorporated in 1882 by lake area fruit growers by acquiring the steamboat Isis. This shallow-draft flat-bottomed boat sank that same year north of here in Lake George, a part of the St. Johns River...

South Florida Railroad's Oviedo Depot

“In 1888, Oviedo orange growers formed the Oviedo, Lake Charm & Lake Jessup Railroad, with the proposed rails to end at Solary's Wharf. This line never operated, but it did serve as a ploy in forcing the South Florida Railroad to lower unfair rates for hauling fruit.” Theodore Mead, having a degree in Civil Engineering from Cornell University, might have been involved.

After Mead’s death in 1936, his orchid collection was bequeathed to Eagle Scout and protégé, Jack Connery. With the aid of Rollins College Professor Edwin Grover, an effort was begun to create the botanic garden in Winter Park on 40 donated acres, about 15 miles from Oviedo. This is the basis of the garden we enjoy today.

Mead Botanical Garden kiosk

Mead Botanical Garden is a pleasant diversion from the well-known area attractions. Most of it is well-kept. (There’s only so much that volunteers, non-profit corporations and city partnerships can do.) Even so, good camera angles can capture the best features.

The garden is bordered on two sides by Howell Creek and Lake Lillian Marsh. Short strolls provide good views of both. Other points of interest include a camellia and cycad collection, a wildflower garden, rose garden, hummingbird garden, greenhouse, lovely bromeliads and various venues for meetings, lectures and entertainment.

Follow me behind the garden wall.

Mussaenda erythrophylla

Succulent, Euphorbia and palm collection

Billbergia pyramidalis

Livistonia chinensis

Creek view

Boardwalk

Medinilla magnifica

Codiaenum variegatum

Clerodendrum thomsoniae

Bromeliad collection

Neoregelia carolinae

Aglaonema communtatum

Kalanchoe gastonis-bonnieri

Tradescantia spathacea


Creek view

Aristolochia macrophylla

Bletilla striata

 
Clerodendrum trichotomum


Return to GoGardenNow.com.

Monday, January 29, 2024

Looking for an ideal companion plant for your vegetable garden?


Image by Willfried Wende from Pixabay

If you’re looking for an ideal companion plant for your vegetable garden, you can’t go wrong with Yarrow. Achillea species and hybrids – aka Yarrow – attract many helpful insects such as pollinators.

Beside pollinators such as bees and butterflies, which are crucial for abundant harvests, yarrow also attracts beneficial insects for natural pest control. Flower flies – Syrphids – and ladybug larvae devour aphids. The more, the better. Right? Then there are the parasitic wasps that gorge on caterpillars, such as tomato hornworms.

Yarrow varieties can grow from 1 to 3 feet tall with colors ranging from white to pink, red to yellow. Shorter varieties are best for vegetable gardens for they are unlikely to overshadow your goodies. They can spread, but are easily divided. The divisions can be replanted elsewhere.

So, if you’re looking for a fine companion plant that’s helpful in the garden, as well as highly ornamental, consider Achillea.

Return to GoGardenNow.com.

The Gardener's To-Do List for February


Aquarius image by Dorothe from Pixabay

You're probably getting the itch to get outside and begin gardening. For some of us, the time is now. For others, not so soon. February barely hints of spring. Swinburne described the month cleverly:

Wan February with weeping cheer,
Whose cold hand guides the youngling year
Down misty roads of mire and rime,
Before thy pale and fitful face
The shrill wind shifts the clouds apace
Through skies the morning scarce may climb.
Thine eyes are thick with heavy tears,
But lit with hopes that light the year's.

If, lit with hope, you must do something, here are a few gardening tasks for February organized by region.

Northeast States: Continue pruning dormant deciduous trees, shrubs, vines; but avoid removing spring flower buds. Continue removing snow from evergreens to avoid limb damage. Inspect indoor plants for disease and insects. Refill bird feeders often. Browse seed catalogs and nursery web sites. Order spring flowering bulbs, onion sets, strawberries, rhubarb and asparagus, if you haven’t already. Start cool season veggies and annuals indoors. Check bulbs and roots in cool storage; throw out rotten ones. Clean and oil garden tools. Organize your potting supplies.

Mid-Atlantic States: Continue pruning dormant deciduous trees, shrubs, vines; but avoid removing spring flower buds.  Maintain house plants, checking for disease and insects. Feed the birds. Browse seed catalogs and nursery web sites. Order spring flowering bulbs, onion sets, strawberries, rhubarb, and asparagus, if you haven’t already. Check bulbs and roots in cool storage; throw out rotten ones. Add mulch to planting beds, if needed. Plant bare-root trees and shrubs. Sow warm-season annuals and vegetables in cold frame. Prune fruit trees, shrubs and vines. Clean and oil garden tools. Take soil samples to your local Cooperative Extension Service for analysis.

Mid-South States: Continue pruning dormant deciduous trees, shrubs, vines.    Avoid removing spring-blooming flower buds. Spray dormant oil on dormant fruit trees, if you haven’t done so yet. Refill bird feeders often. Add mulch to planting beds, if needed. Take soil samples to your local Cooperative Extension Service for analysis. Adjust pH, if necessary. Sow warm-season annuals and vegetables in cold frame. Plant bare-root trees and shrubs. Clean and oil garden tools.

Lower South and Gulf States: Continue pruning dormant deciduous trees, shrubs, vines. Spray dormant oil on dormant fruit trees, if you haven’t done so yet.    Continue planting and transplanting broadleaf and evergreen trees and shrubs, perennials and ground covers. Continue to irrigate shrubs and trees as long as weather is above freezing. Fertilize trees and shrubs when dormant, if you haven't done it yet. Fertilize roses. Add mulch to planting beds, if needed. Take soil samples to your local Cooperative Extension Service for analysis. Adjust pH, if necessary.

Plains and Rocky Mountain States: Follow the same regimen as for Northeast States. In addition, Prepare your grow lights and seed-starting supplies. Take inventory of your garden tools, and buy more, if necessary.

Pacific Northwest States: Follow the same regimen as for Mid-Atlantic States. In addition, plant fruit trees, roses, and cool-season vegetable crops. Divide perennials like hosta, daylilies, such.

Return to GoGardenNow.com.

Tuesday, January 16, 2024

Bad-mouthing Ground Covers?


Lamiastrum galeobdolon

Bad-mouthing Groundcovers?

Embrace Them, Instead

Gardening articles frequently appear in magazines and newspapers complaining about “invasive”, “aggressive”, “opportunistic” or “energetic” plants that gardeners should avoid. The authors might be well-intentioned, but their opinions are almost entirely based upon personal, subjective experiences which are sensationalized, ill-informed, poorly considered, or they are parroting others. Nevertheless, their alarms are read by other gardeners and accepted as gospel-truth. Consequently, many fine solution plants are shunned, especially groundcovers.

Here’s a list of some that we are told to avoid:

Ajuga reptans - Bugle Weed
Carex spp. -
Sedges
Dichondra argentea -
Silver Dollar Weed
Euonymus fortunei -
Wintercreeper
Ficus pumila -
Creeping Fig
Gelsemium sempervirens -
Carolina Jessamine
Hedera spp. -
Ivy
Hemerocallis fulva -
Ditch Lily
Hydrocotyle spp. -
Pennywort
Hypericum calycinum -
St. John's Wort
Lamiastrum galeobdolon -
Yellow Archangel
Laurentia fluviatilis -
Blue Star Creeper
Lespedeza spp. -
Bush Clover
Liriope spicata -
Creeping Lily Turf
Lysimachia clethroides - Gooseneck Loosestrife
Lysimachia nummularia -
Moneywort
Mazus reptans -
Creeping Mazus
Nassella tenuissima, aka Stipa tenuissima -
Ponytail Grass
Ophiopogon japonicus -
Mondo Grass
Pachysandra terminalis -
Japanese Pachysandra
Rubus calycinoides -
Ornamental Raspberry
Trachelospermum asiaticum -
Asiatic Jasmine
Sedum spp. -
Stonecrop
Veronica spp. -
Speedwell
Vinca major -
Big Leaf Periwinkle
Vinca minor -
Periwinkle

Yada yada yada. The list goes on and on.

What those “experts” are ignoring is that these plants do what effective groundcovers are supposed to do; they cover ground. Without them, we are left with the kinds of problems that bare soils present us – wind and water erosion, soil compaction, weed infestations or bare spots where nothing else will grow, parched earth or boggy soils, and just plain ugliness.

Choose wisely.

Rather than eschew such solution plants, they should be adopted happily, planted selectively and maintained appropriately. Recognize from the start that ground covers, just as any other group of garden plants, serve particular purposes which others may not. Erosion, soil compaction, weed infestations, dense shade, arid and boggy soils can be solved with appropriate plant choices. Groundcover plants are in high demand as lawn grass substitutes, and what grass substitute is worth planting if it doesn’t spread rapidly and extensively.

Set limits.

Know that ground covers will do just that – cover ground. With that in mind, define their limits and stick to them. Physical barriers such as steel, brick or concrete edging are usually effective. Mechanical edging with power tools also works very well, sometimes in combination with physical barriers. 

Maintain them.

Nearly every plant in the landscape requires maintenance. Fertilizing, pruning and occasional mowing might be needed. Gardeners should assess their own willingess or abilities, and select their groundcovers accordingly.

Briefly said, take those exaggerated alarms about ground covers with a grain of salt.

Return to GoGardenNow.

Tuesday, January 2, 2024

The Gardener's To-Do List for January


Capricorn image by Dorothe from Pixabay

There’s not much new garden work to do in January. If you completed all your garden tasks in November or December, you should relax with your coffee or tea, seed catalogs and spring garden plans. In case you’re not sure, here is your checklist to review.

Northeast and Mid-Atlantic

Get your seeds ordered ASAP before they’re sold out!
Inspect your cold frames for needed repairs.
Organize your garden tools.
Add kitchen scraps to your compost bin.
Check the wrapping on your evergreen trees and shrubs, if you added any for snow protection.
It’s easy to forget watering during winter. Make sure your garden gets a couple inches each week.
Drain garden hoses and store them out of the way after each use.

South

Start planting asparagus and strawberries.
Be ready to cover crops again with frost cloth in case temperatures drop severely.
Get your seeds ordered.
Plant trees, shrubs and vines.
Add fallen leaves and kitchen scraps to your compost pile.
Prune certain ornamental trees and shrubs, grape vines, and fruiting shrubs.
Make sure your garden gets a couple inches of water each week.
Drain garden hoses and store them out of the way after each use.

Midwest

Organize your garden tools.
Inspect your cold frames for needed repairs.
Get your seeds ordered very soon.
Check your garden beds in case more mulch is needed.
Check the wrapping on your evergreen trees and shrubs, if you added any for snow protection.
Don’t forget to water your garden. Rain and snowfall might not be enough during dry winters.
Drain garden hoses and store them out of the way after each use.

Pacific Northwest

Get your seeds ordered now.
Add kitchen scraps to your compost bin.
Make sure your garden gets a couple inches of water each week.
Drain garden hoses and store them out of the way after each use.
Organize your garden tools.

West Coast

Plant bare root trees, shrubs and vines.
Add compost to your garden.
Refresh mulch, if necessary.
Organize your garden tools.
Keep your plants well-watered.
Get your seeds ordered now before they’re sold out!

Southwest

Plant winter vegetables and warm season annuals.
Be prepared to protect citrus from cold snaps.
Organize your garden tools.
Check frost protection fabric for tears.
Get your seeds ordered right away.
Inspect your irrigation system for leaks. Now is no time to waste water.
Make needed repairs to your garden tools before the spring rush.