More plants from seeds, cuttings and divisions.
There’s a lot of fun stuff for kids to learn from gardening including multiplying and dividing.
No! I’m not talking about memorizing flash cards. I’m talking about growing new plants from seeds, rooting cuttings and dividing plant clumps.
Kids like to see things happening. If results are too long in coming, little people lose interest. (So do big people nowadays.) Choose seeds that germinate quickly, cuttings that root readily, and clumps that are easy for little fingers to work with.
Of course, it’s back-to-school time, so, unless you’re planting a fall garden, there won’t be too many weeks left to grow things outdoors. Best to plan for indoor activities, and make your plans to suit the seasons.
Fall and Winter Projects
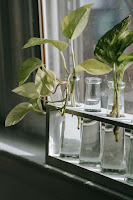
For fall and winter projects, root stem cuttings. This would be a good time to salvage some of those leggy coleus from your garden beds and planters. Indoor plants such as Pothos (Devil’s Ivy), Plectranthus (Swedish Ivy) and Dracaena are also easy to root from cuttings.
You’ll need
- plants for cuttings
- garden clippers
- water
- glass jars
Steps
- Select top-most stems.
- Clip just below the node where the 4th or 5th leaf is attached. Roots will emerge from the nodes, not from the internode.
- Strip the leaves from the lower 2 nodes.
- Place the cut ends in jars of water.
- Arrange the jars where they’ll receive bright, indirect sunlight.
- Roots should begin to emerge within a week or two.
Another quick project is to divide perennial plant clumps. Likely candidates include daylilies, liriope, and mondo. They’re certainly among the easiest to divide.
You’ll need
- plants for dividing
- garden clippers
- water
- clean pots
- light, peat-based potting soil
Steps
- Wash excess soil from the clump of roots.
- Select individual sprigs with several roots attached.
- Gently separate the sprigs from the clump until eventually the entire clump has been separated.
- Replant the individual sprigs in pots with potting soil.
- Water well.
- Drain water from the pots.
- Arrange the pots where they’ll receive bright light
Prepare spring-blooming bulbs for forcing.
This is about as easy as it gets. Most can be forced to bloom indoors, but hyacinths, narcissus – not paperwhites – and tulips are among the most popular. Flower bulbs must be chilled for several weeks – 12 to 16 – to replicate winter weather exposure. Just enclose them in a paper bag or box and pop them in the refrigerator. They must NOT be refrigerated in the presence of ripening fruit, however. Ethylene gas released by the fruit will “kill” the bulbs so they won’t sprout at all. When sufficient time has passed, your pre-chilled bulbs will be ready to plant in bulb bowls for lovely winter displays. Glass bowls specially designed for hyacinths are readily available.
Timing is important when chilling bulbs for forcing, especially if you intend to give them as Christmas gifts. Buy them as soon as they hit the market in fall, then get them in the fridge.
Amaryllis bulbs – aka Hippeastrum – are the easiest of all. They require no chilling whatsoever. Just plant them in bulb bowls and watch them grow.
Paperwhite narcissus do not require much chilling. Bulbs planted in bowls only need about 2 to 4 weeks at 50 degrees F. before moving to a warmer location.
Spring Projects
In addition to the projects named before, plant some seeds indoors and watch them germinate.
You’ll need
- Seeds – sunflower, bean, pea, cucumber, melon and tomato seeds are among the easiest to start
- Small peat pots or pellets
- Seed starting tray
- Water
- Bright light source
Peat pots may be pre-filled, or not. If not, you’ll need a light grade of high-quality peat-based potting soil for filling.
Plant 1 to 2 seeds per pot, usually no deeper than the first digit of your finger. Best check the seed packet for specific recommendations. If you’re using pellets, you must moisten them first.
Place the pots in a leak-proof tray. Water lightly. Place near a bright light source. A window sill or grow-light will be ideal. Maintain slight moisture in the pots. When the seeds have germinated, the pots or pellets can be planted directly in the outdoor garden as the weather warms.
Just the beginning
These suggestions are just the beginning. There are so many gardening projects you can include in your home-school curriculum. It’d be impossible to name them all. They’re limited only by your creativity, which is probably boundless. Right?
Return to GoGardenNow.com.


